Tuesday, April 12, 2011

Capturing A Bee Swarm


This past Sunday's class was quite exciting. First, we had a swarm of bees to capture then we got to try Miracle Berry and MBerry tablets. I will have to write about the experience with Miracle Berry in a separate blog entry.

When I got to the class on Sunday, it was windy and overcast. When I left the box of oatmeal cranberry white chocolate chip cookies on the potluck table, there was no other food item there. I wondered if we were going to have anything to eat. A few people were scattering around the hill. I heard them talking about a bee swarm. A bee swarm! Awesome! I made a connection with bees last May when I first witnessed the capturing of a bee swarm.

I immediately ran over to my car to get my camera. I had to get it on video this time.
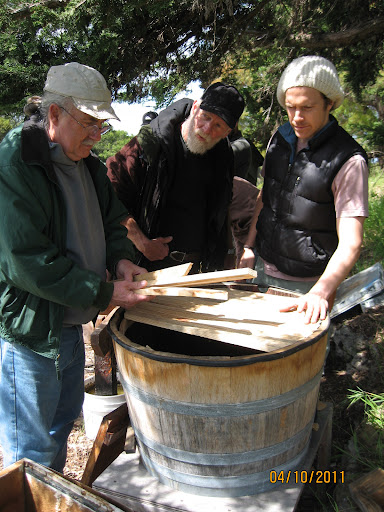

Master Ken, David, and John showed us a prototype top bar beehive that Nobuto made with a half wine barrel. Nobuto was in one of the classes last year. He has carpentry experience and the work he did with each top bar shows. They all fit perfectly on the top of the wine barrel. I remember how much difficulty I had trying to make a top cover for the fish tank that I donated to the class for snail ranching.

They set up the wine barrel beehive for the new swarm we were going to capture.

By now I am pretty calm with the bees buzzing near me. I also have a lot of trust in John, Master Ken, and David as I have seen them handling bees over several semesters. John keeps bees on his own homestead farm, so he has his own first hand experience with bees.

Unless you were as fortunate as I to personally witness bee swarm capturing with this group of people, it is hard to convince you how peaceful it felt. Of course you have to remain calm. Master Ken also mentioned that bees do not like the smell of banana, so don't eat banana before getting close to the bees. The video is about 7 minutes long, but the actual process was more like 1 hour. It was done very slowly and carefully. They are not commercial beekeepers and tried not to hurt any bee in the process.

Pruning the branches to get ready for capturing the swarm.

After David brushed all the bees into the beehive, they put the top on the wine barrel to let the bees settle in. We filled the buckets which the legs of the beehive bench sit in with more water. The water prevents the ants from crawling up the bench to get into the hives. The weeds and tree branches around the beehives were also removed to prevent them from touching the beehives and became bridges for ants. If ants got into the hives, the bees would abandon the hives.

Saturday, April 9, 2011

Baking Oatmeal Cranberry White Chocolate Chip Cookies

Mixing the ingredients. Note my new cookie dough scoop!

I was trying to see what I can make for Master Ken's class tomorrow. We have a potluck during every class meeting, and I love it. It's rare for me not to bring any food to share. I looked into my pantry and saw 2 bags of dried cranberries. I got them not long ago when they were on sale, buy one get one free. I grabbed one of the bags and looked on the back. I have found quite a few excellent recipes from packaging of food items. Ha, a recipe for Oatmeal Cranberry White Chocolate Chunk Cookies, and I have all the ingredients!

adding cranberries and white chocolate chips

I was a bit short on oatmeal, so I had to do some math to adjust the recipe. Here's the original recipe:

2/3 cup butter, softened                                 1 teaspoon baking soda
2/3 brown sugar                                             1/2 teaspoon salt
2 large eggs                                                    6 oz. dried cranberries
1-1/2 cups old-fashioned oats                        2/3 cup white chocolate chunks or chips 
1-1/2 cups flour

Preheat oven to 375 degrees F. Using an electric mixer, beat butter and sugar together in a medium mixing bowl until light and fluffy. Add eggs, mix well. Combine oats, flour, baking soda and salt in a separate mixing bowl. Add to butter mixture in several additions (My tip: Important step! Do not dump it all in at once!), mixing well after each addition. Stir in dried cranberries and white chocolate chips. Drop by rounded teaspoonfuls onto ungreased cookie sheets. Bake for 10-12 minutes or until golden brown. Cool on wire rack. Makes approximately 2-1/2 dozen cookies.

Ready for the oven

I got a new cookie dough scoop last year. It was a bit pricey but my first cheap cookie dough scoop fell apart on me. Hopefully this expensive scoop will last. I also just now realized that I used baking powder instead of baking soda. The cookies turned out quite well, so it appears it is okay to use baking powder. These cookies smell incredible. I love the smell of freshly baked pastries. I wish I knew how I could bottle this awesome smell and use it as home scent. Is there such a product? I guess those scented candles are for the same purpose.

I ate 3 cookies as they came out of oven. Although I adjusted the recipe, I still ended up with 36 cookies.  Tomorrow morning I don't have to get up early to cook or bake, and we will have dessert at the potluck!

Cookies are done!

Thursday, April 7, 2011

Pre Sand Village Days - Paving A Patio With Free Material


When I was pulling weeds yesterday, I thought about how I put together this brick patio all by myself without spending any money other than gas for transporting the free material. It was back in 2009 before I started my vegetable garden. I just wanted an area in the middle of the yard that I could put a patio set as a gathering spot.

I didn't want to spend too much money on the project, so I started looking into "free" section under "for sale" on craigslist.org. I was only interested in picking up free material within 5 miles radius from home. The posting I had been waiting for showed up one Saturday morning. A house up in Kensington was being remodeled, and they had taken down their old fireplace. The bricks from the fireplace were outside of the house free for the taking. I responded to the posting, got the address, and went up to get the bricks. I roughly estimated that I needed at least 400 bricks for the size of my patio.


The bricks were quite heavy, so I made at least 6 trips in two days to upload and unload the bricks. I also picked up some free sand from a house in Berkeley. Before I could lay the bricks down, I had to dig up the weeds. That digging was a back breaking job since the soil was extremely dry and hard. Finally, on April 29, 2009, I start putting the bricks together. I had never put anything together like this before, so I looked up some patterns and methods on the internet. That was all the knowledge I had. Everyday after work I was out there assembling my patio for the next two weeks. Some bricks had mortar attached to them, so I had to either try to knock the mortar off or dig the ground to fit the uneven bricks.

As I was finishing up the patio, I picked up a free patio table with 2 chairs in Albany. The table was small enough to fit into the back of my PT Cruiser. I put 3 coats of paint on the table. I also picked up a free patio umbrella from a nice elderly woman in El Cerrito Hills. The woman explained to me that the squirrels had chewed up the fabric at a few spots; other than that, it was a really nice umbrella. I didn't mind the holes. I could sew them up easily. That was a much easier job than paving the bricks!

So, this is how I got my patio. About a month after its completion, I hosted my first BBQ in the garden to celebrate my cousin's going off to college.

Little cousin was leaving for UC Riverside

Wednesday, April 6, 2011

Weeding

Before

A couple Sundays ago, Master Ken spent at least an hour talking about mulching and weed control. He said that he personally doesn't spend much effort fighting weeds, but if we really want to suppress weeds, we need to get 3-4 inches of mulch. When Backyard Food Garden worked on Sand Village Farm last year, they dumped 2 truck loads of mulch on the farm. It barely covered the area. Now after the rain season, much of the weeds have returned. I also noticed some new weeds that I don't remember seeing before.

During Master Ken's lecture, Crabgrass and Bermuda Grass were mentioned as two common tough weeds to control. I didn't know exactly what they looked like at the time, but I was pretty sure I have both on the farm among many others, such as California poppy and Nasturtium. Anything can be a weed if it is growing in the areas that you don't want them to be.

After

The patio area was now covered with weeds. You could barely see the patio. It was time to pull those weeds out, so I can host BBQ gatherings during the summer months. I spent just under an hour pulling as many weeds as possible from between the bricks. It gets hot very quickly when you are doing bending, squatting, and pulling under the sun. I got about half way done and decided to finish up later on, possible after the sun goes down.

I saved a few California poppy and nasturtium plants that I pulled out. A friend of mine loves anything orange including orange flowers. California poppy and nasturtium both have bright orange flowers, so I am going to see if I can get them to grow in a couple pots. From past experience I know they don't transplant well. Alternatively I can grow them from seeds.

California poppy is considered a weed on the farm

Monday, April 4, 2011

Still Trying to Grow Some Cherries

one of the grafted cherry scions is blooming

I grafted some apple, plume, and cherry scions after coming back from the scion exchange in January. It was my first time grafting fruit trees. I found out later on that the ideal grafting weather is a heavily overcast day. A sunny day would great reduce the success of grafting because the scions have a much higher chance of drying out before establish themselves on the trees. Additionally, I didn't have enough grafting tape. After stopping at 2 stores and not able to find any grafting tape, I simply used some masking tape that was readily available in my garage.

I didn't expect much success in my first attempt to graft. To my surprise, one of the cherry scions is now blooming! In the picture above, I grafted 2 scions to one branch. One of them is budding and blooming. This is the only scion that shows obvious signs of life among all the scions I grafted. I might have additional success on the apple tree, which I will find out in a month.

planted cherry scion

In addition to grafting, I also planted one cherry scion in a small pot. It appears to be still alive although I am not sure how much it has rooted. It got knocked over a few times either by squirrels or birds. I also planted a small Capulin cherry tree in December. This is a fast growing variety which can reach 10 feet in 12-18 months and eventually reach up to 30 feet. I will have to make sure to cut it back so it doesn't reach 30 feet! I can't possibly pick the cherries from a 30 feet tree.

Master Ken actually told us in the class that we will most likely not getting any cherries from our yards if we don't have any barrier to keep birds and squirrels away.

planted Capulin cherry